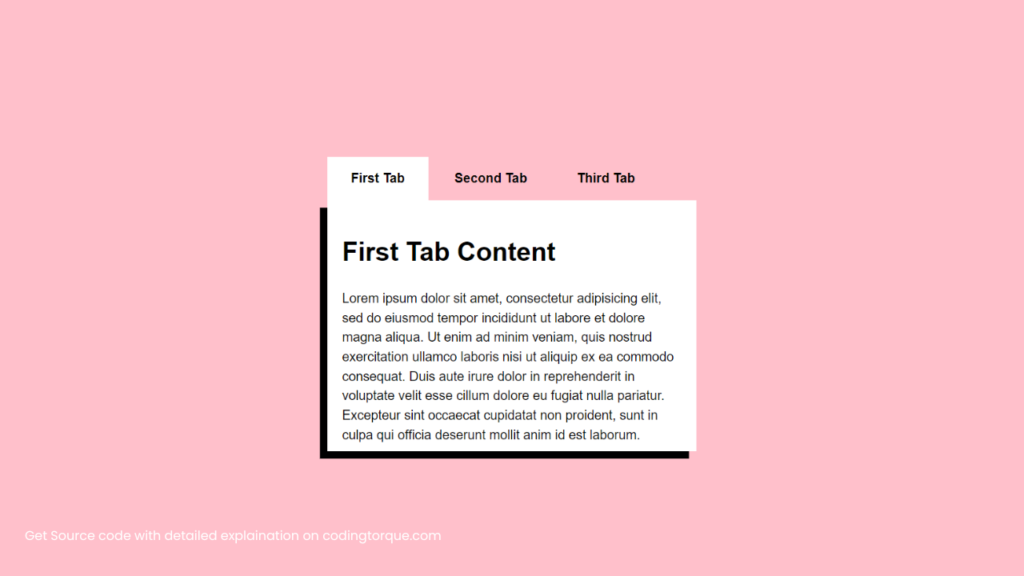
Tabs are an excellent way to organize content on a webpage and provide a clean, organized layout for your visitors. In this tutorial, we’ll show you how to create tabs using pure HTML and CSS without any JavaScript. You’ll learn how to create the structure of the tabs using HTML and then use CSS to style them, making them functional and visually appealing. With this method, you’ll be able to create responsive tabs that look great on all screen sizes, without the need for any additional frameworks or libraries. By the end of this tutorial, you’ll have a solid understanding of how to create tabs using pure HTML and CSS, and you’ll be able to apply this knowledge to your own web development projects. So, let’s get started on creating beautiful and functional tabs using pure HTML and CSS!
Before we start here are 50 projects to create using HTML CSS and JavaScript –
I would recommend you don’t just copy and paste the code, just look at the code and type by understanding it.
Demo

HTML Code
Starter Template
<!doctype html>
<html lang="en">

<head>
    <!-- Required meta tags -->
    <meta charset="utf-8">
    <meta name="viewport" content="width=device-width, initial-scale=1">

    <!-- CSS -->
    <link rel="stylesheet" href="style.css">

    <title>Tabs using Pure HTML and CSS - Coding Torque</title>
</head>

<body>
    <!-- Further code here -->
</body>

</html>
Paste the below code in your <body> tag.
<div class="tabs">

    <input type="radio" name="tabs" id="tabone" checked="checked">
    <label for="tabone">First Tab</label>
    <div class="tab">
        <h1>First Tab Content</h1>
        <p>Lorem ipsum dolor sit amet, consectetur adipisicing elit, sed do eiusmod tempor incididunt ut labore et
            dolore magna aliqua. Ut enim ad minim veniam, quis nostrud exercitation ullamco laboris nisi ut aliquip
            ex ea commodo consequat. Duis aute irure
            dolor in reprehenderit in voluptate velit esse cillum dolore eu fugiat nulla pariatur. Excepteur sint
            occaecat cupidatat non proident, sunt in culpa qui officia deserunt mollit anim id est laborum.</p>
    </div>

    <input type="radio" name="tabs" id="tabtwo">
    <label for="tabtwo">Second Tab</label>
    <div class="tab">
        <h1>Second Tab Content</h1>
        <p>Lorem ipsum dolor sit amet, consectetur adipisicing elit, sed do eiusmod tempor incididunt ut labore et
            dolore magna aliqua.</p>
    </div>

    <input type="radio" name="tabs" id="tabthree">
    <label for="tabthree">Third Tab</label>
    <div class="tab">
        <h1>Third tab content</h1>
        <p>hfioezhogehzioghz</p>
    </div>
</div>
CSS Code
Create a file style.css and paste the code below.
body {
  background: pink;
  min-height: 100vh;
  box-sizing: border-box;
  font-family: "HelveticaNeue-Light", "Helvetica Neue Light", "Helvetica Neue",
    Helvetica, Arial, "Lucida Grande", sans-serif;
  font-weight: 300;
  line-height: 1.5;
  max-width: 60rem;
  margin: 0 auto;
  font-size: 110%;
  display: flex;
  justify-content: center;
  align-items: center;
}

.tabs {
  display: flex;
  flex-wrap: wrap;
  height: 300px;
  width: 500px;
}
.tabs label {
  order: 1;
  display: flex;
  justify-content: center;
  align-items: center;
  padding: 1rem 2rem;
  margin-right: 0.2rem;
  cursor: pointer;
  background-color: pink;
  font-weight: bold;
  transition: background ease 0.3s;
}
.tabs .tab {
  order: 9;
  flex-grow: 1;
  width: 100%;
  height: 100%;
  display: none;
  padding: 1rem;
  background: #fff;
  padding: 20px;
  box-shadow: -10px 10px 0px 0px black;
}
.tabs input[type="radio"] {
  display: none;
}
.tabs input[type="radio"]:checked + label {
  background: #fff;
}
.tabs input[type="radio"]:checked + label + .tab {
  display: block;
}
@media (max-width: 465px) {
  .tabs .tab,
  .tabs label {
    order: initial;
  }
  .tabs label {
    width: 100%;
    margin-left: 50px;
  }
}
Final Output

Written by: Piyush Patil
Code Credits: @celcarpe
If you found any mistakes or have any doubts please feel free to Contact Us
Hope you find this post helpful💖


