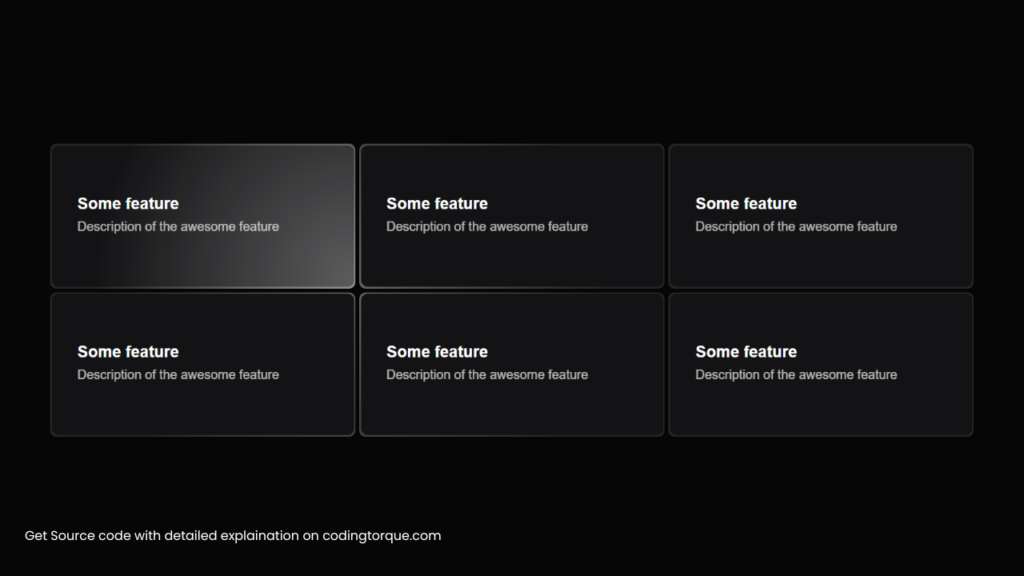
Forget the boring black cursor! We’ll design a glowing masterpiece that trails your every move, adding a touch of personality and flair to your web experience.
I would recommend you don’t just copy and paste the code, just look at the code and type by understanding it.
Demo
HTML Code
Starter Template
<!doctype html>
<html lang="en">

<head>
    <!-- Required meta tags -->
    <meta charset="utf-8">
    <meta name="viewport" content="width=device-width, initial-scale=1">

    <!-- CSS -->
    <link rel="stylesheet" href="style.css">

    <title>Linear Style Cursor Glow Effect using HTML CSS and JavaScript - Coding Torque</title>
</head>

<body>
    <!-- Further code here -->

    <script src="script.js"></script>
</body>

</html>
Paste the below code in your <body> tag.
 <div class="features">
   <div class="feature">
     <a href="#" class="feature-content">
       <strong>Some feature</strong>
       <span>Description of the awesome feature</span>
     </a>
   </div>
   <div class="feature">
     <a href="#" class="feature-content">
       <strong>Some feature</strong>
       <span>Description of the awesome feature</span>
     </a>
   </div>
   <div class="feature">
     <a href="#" class="feature-content">
       <strong>Some feature</strong>
       <span>Description of the awesome feature</span>
     </a>
   </div>
   <div class="feature">
     <a href="#" class="feature-content">
       <strong>Some feature</strong>
       <span>Description of the awesome feature</span>
     </a>
   </div>
   <div class="feature">
     <a href="#" class="feature-content">
       <strong>Some feature</strong>
       <span>Description of the awesome feature</span>
     </a>
   </div>
   <div class="feature">
     <a href="#" class="feature-content">
       <strong>Some feature</strong>
       <span>Description of the awesome feature</span>
     </a>
   </div>
 </div>
CSS(SCSS) Code
Create a file style.css and paste the code below.
html,
body {
  width: 100%;
  height: 100%;
  margin: 0;
  padding: 0;
  background: #060606;
}

body {
  display: flex;
  justify-content: center;
  align-items: center;
}

*,
*:before,
*:after {
  box-sizing: border-box;
  position: relative;
}

.features {
  width: 75vw;
  height: 50vh;
  display: grid;
  grid-column-gap: 0.3rem;
  grid-row-gap: 0.3rem;
  grid-template-columns: repeat(3, 1fr);
  grid-template-rows: repeat(2, 1fr);
}

.feature {
  --x-px: calc(var(--x) * 1px);
  --y-px: calc(var(--y) * 1px);
  --border: 2px;
  background: rgba(255, 255, 255, 0.125);
  border-radius: 0.5rem;
  overflow: hidden;

  &:before,
  &:after {
    content: "";
    display: block;
    position: absolute;
    top: 0;
    left: 0;
    height: 100%;
    width: 100%;
    inset: 0px;
    border-radius: inherit;
    background: radial-gradient(
      800px circle at var(--x-px) var(--y-px),
      rgba(255, 255, 255, 0.3),
      transparent 40%
    );
  }

  &:before {
    z-index: 1;
  }

  &:after {
    opacity: 0;
    z-index: 2;
    transition: opacity 0.4s ease;
  }

  &:hover:after {
    opacity: 1;
  }
}

.feature-content {
  background: rgb(19, 19, 21);
  border-radius: inherit;
  color: white;
  text-decoration: none;
  z-index: 1;
  position: absolute;
  inset: var(--border);
  display: grid;
  grid-template-rows: 1fr 1fr;
  grid-row-gap: 0.5rem;
  padding: 0 1rem 0 2rem;

  > strong {
    align-self: self-end;
    font-size: 125%;
  }

  > span {
    opacity: 0.7;
  }
}
JavaScript Code
Create a file script.js and paste the code below.
console.clear();
const featuresEl = document.querySelector(".features");
const featureEls = document.querySelectorAll(".feature");

featuresEl.addEventListener("pointermove", (ev) => {
  featureEls.forEach((featureEl) => {
    // Not optimized yet, I know
    const rect = featureEl.getBoundingClientRect();

    featureEl.style.setProperty("--x", ev.clientX - rect.left);
    featureEl.style.setProperty("--y", ev.clientY - rect.top);
  });
});
Final Output

Written by: Piyush Patil
Code Credits: https://codepen.io/davidkpiano/pen/gOoNZNe
If you found any mistakes or have any doubts please feel free to Contact Us
Hope you find this post helpful💖


